es20-226-cj2 93 / 120
10秒後にBOOKのページに移動します
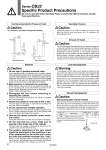
W W With head end lock With rod end lock Series CBJ2 Specific Product Precautions Be sure to read this before handling. Please consult with SMC for products outside these specifications. Use Recommended Air Pressure Circuit. Caution . It is necessary for proper locking and unlocking. Operating Pressure Caution Supply air pressure of 0.15 MPa or higher to the port on the side that has the lock mechanism, as it is necessary for disengaging the lock. Exhaust Air Speed Caution The lock will engage automatically if the air pressure at the port on the side that has the lock mechanism becomes 0.05 MPa or less. Be aware that if the piping on the side that has the lock mechanism is narrow and long, or if the speed controller is located far from the cylinder port, the exhaust air speed could become slower, involving a longer time for the lock to engage. A similar result will ensure if the silencer that is installed on the exhaust port of the solenoid valve becomes clogged. Lock Disengagement Warning To disengage the lock, make sure to supply air pressure to the port on the side without a lock mechanism, thus preventing the load from being applied to the lock mechanism. (Refer to the recommended air pressure circuit.) If the lock is disengaged when the port on the side that does not contain a lock mechanism is in the exhausted state and the load is being applied to the lock mechanism, undue force will be applied to the lock mechanism, and it may damage the lock mechanism. Also, it could be extremely dangerous, because the piston rod could move suddenly. Selection Caution 1. Do not use a 3 position solenoid valve. Avoid using this cylinder in combination with a 3 position solenoid valve (particularly the closed center metal seal type). If air pressure becomes sealed inside the port on the side that contains the lock mechanism, the lock will not engage. Even if the lock is engaged at first, the air that leaks from the solenoid valve could enter the cylinder and cause the lock to disengage as time elapses. 2. Back pressure is necessary for unlocking. Before starting, make sure that air is supplied to the side that is not equipped with a lock mechanism as shown in the diagram above. Otherwise, the lock may not disengage. (Refer to “Rock Disengagement”.) 3. Disengage the lock before installing or adjusting the cylinder. The lock could become damaged if the cylinder is installed with its lock engaged. 4. Operate the cylinder at a load ratio of 50% or less. The lock might not disengage or might become damaged if a load ratio of 50% is exceeded. 5. Do not synchronize multiple cylinders. Do not operate two or more end lock cylinders synchronized to move a single workpiece because one of the cylinder locks may not be able to disengage when required. 6. Operate the speed controller under meterout control. If operated under meter-in control, the lock might not disengage. 7. On the side that has a lock, make sure to operate at the stroke end of the cylinder. The lock might not engage or disengage if the piston of the cylinder has not reached the stroke end. 8. The position adjustment of the auto switch should be performed at two positions; a position determined by the stroke and a position after the backlash movement (by 1 mm). When a 2-color indication switch is adjusted to show green at the stroke end, the indication may turn red when the cylinder returns by the backlash. This, however, is not an error. Rubber cap Bolt should be detached under normal operation, otherwise it may cause malfunction of the locking feature. Manual Disengagement Caution Non-locking style manual release Insert the bolt, which is provided as an accessory part, through the rubber cap (it is not necessary to remove the rubber cap). Screw the bolt into the lock piston and pull the bolt to disengage the lock. Releasing the bolt will re-engage the lock. The bolt size, pulling force, and the stroke are listed below. Bore size (mm) Thread size Pulling force N Stroke (mm) 16 M2.5 x 0.45 x 25L or more 4.9 2 91